Improving the way you walk can transform how you move, feel, and live every day. That’s exactly what gait training is about: using targeted exercises and strategies to improve walking mechanics, balance, and confidence. Whether you’re recovering from an injury, dealing with a neurological condition, or simply feeling less steady as you age, even small changes in your gait can lead to big gains in mobility and independence.
What Is Gait Training?
Gait training is a structured approach to improving how you walk. It’s commonly used in physical therapy to:
- Restore walking after injury, surgery, or stroke
- Reduce fall risk
- Improve walking speed, endurance, and efficiency
- Decrease pain and joint stress
A typical gait training program looks at:
- Stride length (how far you step)
- Step width (how far apart your feet are)
- Foot placement (heel strike, push-off)
- Posture and arm swing
- Balance, coordination, and strength
A therapist might analyze your gait with video, pressure-sensitive walkways, or observational assessment, then prescribe targeted exercises to correct issues.
Who Can Benefit from Gait Training?
Gait training isn’t just for elite athletes or post-surgery patients. It’s beneficial for many people, including those with:
- Stroke or brain injury
- Parkinson’s disease or multiple sclerosis (MS)
- Hip, knee, or ankle arthritis
- Post-hip or knee replacement
- Chronic low back pain
- Frequent trips or falls
- General age-related weakness or balance problems
Even if you’re relatively healthy, but feel “stiff” or “clumsy” when you walk, a basic gait training routine can help you move more smoothly and efficiently.
Step 1: Check Your Baseline Walking Pattern
Before you can improve your gait, you need to understand how you walk now.
Self-check gait scan
Walk in a safe, well-lit area and notice:
- Do you look at the floor instead of ahead?
- Do your arms swing freely or stay stiff at your sides?
- Do you land on your heel first or flat-footed?
- Are your steps short and shuffling or long and overstriding?
- Do you lean to one side or feel wobbly when you turn?
If possible, ask someone to record a short video of you walking from the front, back, and side. This gives you visual feedback and can be very revealing.
If you notice significant limping, sudden changes in your gait, or pain that worsens with walking, consult a medical professional or physical therapist before starting a program.
Step 2: Foundation First – Posture and Alignment
Efficient gait starts with good posture. Without it, you’re fighting your own body every step.
Key posture cues for better walking:
- Head: Look straight ahead, not at your feet. Imagine a string gently pulling the crown of your head upward.
- Shoulders: Relax them down and back; avoid hunching forward.
- Torso: Lightly engage your core—think about gently pulling your belly button toward your spine.
- Hips: Keep them level; avoid leaning or swaying side-to-side.
- Feet: Point forward, not turned sharply in or out.
Practice standing tall in front of a mirror, then walk a few steps while maintaining that posture. This simple reset can immediately change how your gait feels.
Step 3: Simple Proven Gait Training Exercises at Home
You don’t need fancy equipment to start gait training. The following exercises target balance, strength, and coordination—three essentials for better walking.
1. Heel-to-Toe Walking (Tandem Gait)
This improves balance and foot placement.
How to do it:
- Stand near a counter or wall for support if needed.
- Place one foot directly in front of the other, heel touching the toes of the back foot.
- Walk 10–20 steps in a straight line, moving slowly and controlled.
- Turn carefully and walk back.
Do 2–3 rounds, once or twice a day.
2. High-Knee Marching
Helps with hip strength and step clearance (reducing trips).
How to do it:
- Stand tall, lightly holding a counter or sturdy chair.
- Lift one knee toward hip height (or as high as is comfortable).
- Lower it and repeat with the other leg, as if marching in place.
- Keep your trunk upright—don’t lean way back.
Aim for 20–30 marches per side.
3. Heel and Toe Raises
Strengthens calves and muscles in the front of the shin to support push-off and controlled heel strike.
Heel raises:
- Stand holding a support.
- Rise up onto the balls of your feet, hold 2–3 seconds, lower slowly.
- Repeat 10–15 times.
Toe raises:
- From standing, lift your toes off the ground while keeping your heels down.
- Hold briefly, lower with control.
- Repeat 10–15 times.
Do 2 sets of each, a few times per week.
4. Side-Stepping
Improves lateral stability and hip strength, which is crucial for safe turning and stepping off curbs.
How to do it:
- Stand with knees slightly bent, feet hip-width apart.
- Step to the side with your right foot, then bring your left foot to meet it.
- Take 10–15 steps to the right, then return to the left.
Keep your torso upright and feet pointing forward.
Step 4: Train the Components of a Healthy Gait
Breaking down gait into parts makes it easier to improve.
A. Heel Strike
Goal: Land gently on your heel, not flat-footed or on your toes (unless you have a specific medical reason to modify).
Drill:
Walk slowly and deliberately on a flat surface, thinking: “Heel, roll, push.” Feel your heel touch first, then your weight roll along the outer edge of your foot toward the toes.
B. Push-Off
Goal: Use your toes and calves to propel you forward, not just “clump” from step to step.
Drill:
During a short walk, focus on pressing the big toe into the ground as you push off. You should feel your calf engage slightly each step.
C. Step Length and Rhythm
Goal: Smooth, even steps—not overly long or tiny shuffles.
Drill:
Count your steps for 30 seconds of walking at a comfortable pace. Try to maintain a consistent rhythm. If your steps are very short, gently encourage a slightly longer step—without overstriding and pulling your body behind your feet.
Step 5: Use Simple Cues to Reprogram Your Walking
Verbal or mental cues can significantly improve gait training results, especially for people with neurological conditions like Parkinson’s disease (source: American Physical Therapy Association).
Try these:
- “Tall and relaxed” – to reset posture.
- “Heel to toe” – to avoid shuffling.
- “Big steps, same rhythm” – to balance length and cadence.
- “Look ahead, not down” – to improve stability and confidence.
Repeat your chosen cue in your head while walking. Over time, this can become automatic.
Common Gait Training Mistakes to Avoid
Even with good intentions, some habits can limit your progress.
- Overdoing it too fast – Rapidly increasing walking distance or exercise intensity can flare pain or fatigue. Progress gradually.
- Ignoring pain signals – Mild muscle fatigue is normal; sharp, joint, or nerve pain is not. Seek guidance if pain persists.
- Training only straight-ahead walking – Real life involves turning, stepping over obstacles, and walking on uneven terrain. Include variety once you’re safe to do so.
- Skipping strength and balance work – Gait training is more effective when your muscles and nervous system are both targeted.
Simple Weekly Gait Training Plan (Example)
Always adapt to your ability level and medical guidance. Here’s a sample, low-intensity framework:
3–4 days per week
-
Warm-up (5 minutes)
- Easy walking around the home or yard
- Gentle ankle circles and marching in place
-
Core gait exercises (10–15 minutes)
- Heel-to-toe walking – 2 rounds
- High-knee marching – 20–30 each side
- Heel and toe raises – 2 sets of 10–15
- Side-stepping – 2 passes each direction
-
Gait practice walk (5–15 minutes)
- Walk at a comfortable pace, focusing on posture and one key cue (e.g., “heel to toe”).
-
Cool-down (3–5 minutes)
- Easy walking, then light calf and hamstring stretches if comfortable.
Increase time, distance, or repetitions gradually—about 5–10% per week if you tolerate it well.
When to Work with a Physical Therapist
While many people can safely start basic gait training at home, certain situations call for professional guidance:
- Recent fall or near-fall episodes
- Recovery from stroke, brain injury, or spinal cord injury
- Parkinson’s disease, MS, or neuropathy
- Recent hip, knee, or ankle surgery
- Unexplained changes in walking pattern
- Significant pain, dizziness, or shortness of breath with activity
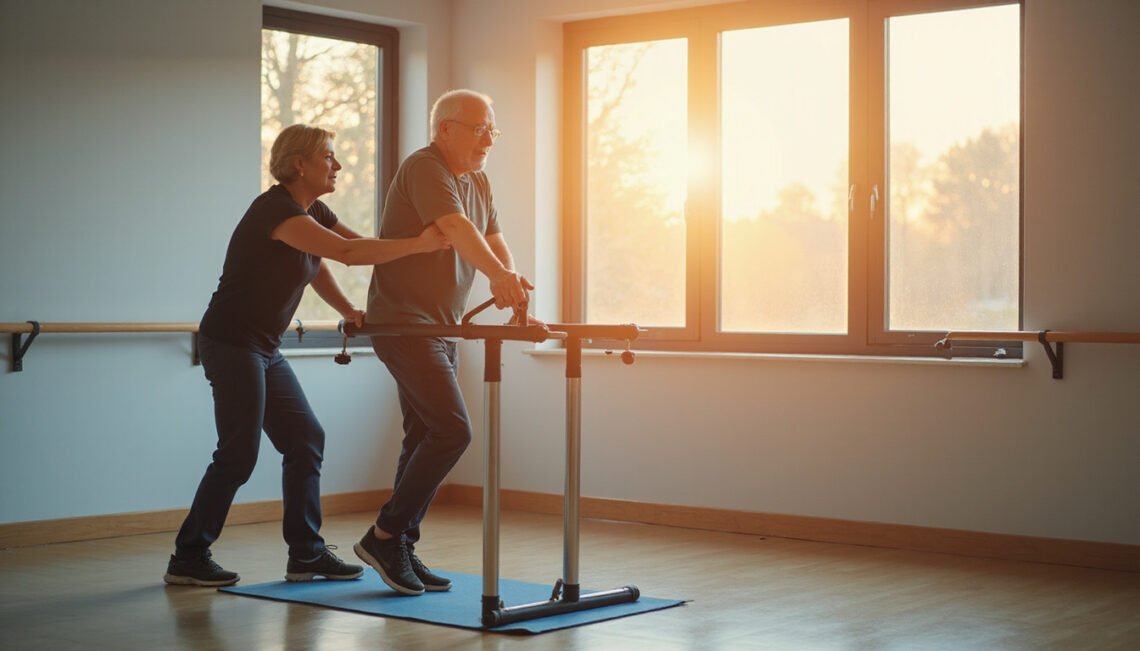
A physical therapist can perform a detailed gait analysis, use tools like treadmills with harness support, and design a fully personalized program. They can also recommend canes, walkers, or other aids if needed and help you learn to use them correctly.
Safety Tips for Home Gait Training
- Use supportive footwear with good grip.
- Clear clutter, loose rugs, and cords from your walking path.
- Keep a sturdy surface (countertop, heavy chair, rail) available for balance when practicing new drills.
- Avoid training when extremely fatigued or dizzy.
- If you live alone and have high fall risk, consider having someone nearby during new or challenging exercises.
FAQ: Common Questions About Gait Training
1. What is gait training in physical therapy?
In physical therapy, gait training is a structured program to restore or improve your ability to walk. Therapists use specific exercises, balance work, assistive devices, and sometimes technology like harnesses or treadmills to help you walk more safely, efficiently, and confidently.
2. How long does gait rehabilitation take to improve walking?
Gait rehabilitation timelines vary widely. Some people notice small improvements in walking mechanics and confidence within a few weeks of consistent gait training. More complex conditions—such as after stroke, spinal cord injury, or advanced neurological disease—may require months or ongoing therapy. Progress is usually gradual but meaningful.
3. Can gait training exercises help with balance and fall prevention?
Yes. Many gait training exercises—like heel-to-toe walking, side-stepping, and strength work for hips and ankles—directly target balance and stability. Combined with home safety changes and, when needed, assistive devices, these exercises can significantly lower your risk of falls.
Improving how you walk is one of the most powerful ways to protect your independence, confidence, and quality of life. With focused gait training, you can build strength, sharpen your balance, and retrain your body to move more smoothly—often with just a few simple exercises practiced consistently.
If your walking feels unsteady, painful, or simply “off,” don’t wait for it to get worse. Start by incorporating some of the techniques in this guide, and consider scheduling an evaluation with a physical therapist who specializes in gait training. Taking action now can help you move with greater ease, safety, and freedom for years to come.